Cleaning a meat slicer can be quite dangerous if you don’t know what you are doing. Not only might it damage the slicer, but you may also risk cutting your hands in the process.
The most important part of the job is knowing how to take off all the parts. The cleaning part is just simply spraying and wiping.
Please read our article below to know how to clean a meat slicer correctly.
Table of Contents
How To Clean A Meat Slicer?
Removing the slicer for cleaning
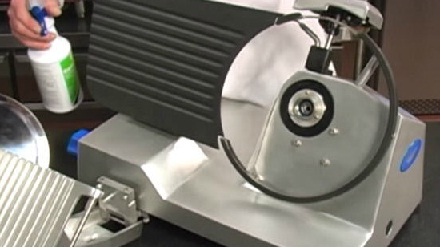
Before we begin, please do note that there are a lot of different meat slicers out there. And they might have a slightly different way of cleaning or taking off their parts for cleaning purposes.
Let’s find out with best electric meat slicer
For this article, we will use the Vollrath meat slicer for demonstration purposes.
Step 1:
Before you do anything else and I do mean absolutely everything else, make sure the slicer is unplugged and has been switched off. The gauge plate should also be in closed position for extra safety
Step 2:
We want to open up the product tray and get that out of the way. Do so by removing the twisting lid on the side and open the tray.
Step 3:
Remove the blade faceplate. Do so by removing the nuts at the backside of the unit. However, don’t remove it all the way. Use the loosen nuts which are connected to the plate, push it back against the blade face to remove it.
Step 4:
Proceed to clean the front side of the blade. Also, remember to remove the plate a little bit to clean up the backside too.
Very Important Note: Most, if not all slicers, including the Vollrath slicer, would have a blade removal tool. I do NOT recommend taking of the blade unless your slicer has a removal tool for such purposes.
Get the sharpening stone up and out of the way, your removal tool should fit perfectly and flush to the blade.
- Step 4.1:
For the Volrath, take the center of the removal tool, insert it to the center of the slicer blade by fitting the pins of the tool into the cutouts of the blade. After you have centering it the tool like we just discussed there, twist it until we see into the blade.
- Step 4.2:
Take the two screws and tighten them to the two points into the blade. Make sure they are firm and shake them a bit to ensure it is secured and fastened.
- Step 4.3:
Now, simply back out the center nut and remove the slicer. Now you can clean the backside of the blade and the center of the slicer where bearings are sealed. Spray and wipe then it’s time to reassemble the slicer.
How To Reassemble To The Slicer?

Step 1
Fit the removal too back to the slicer and twist it a bit to check if it has fit perfectly first. If it doesn’t, twist it back and forth until it does.
Step 2
Once the removal has been put back to the slicer properly, turn in the center nut on the blade. Do so until it is snug.
View more: Electric meat grinder
Step 3
Remove the blade removal tool by loosening the two nuts until the tool comes off.
Step 4
Next, we need to reassemble the faceplate. Place the plate back to its position and insert the screw from the back then tightening down the nut.
Step 5
Return the product tray back to its original position and secure it with its nut.
Bottom line
Now you should know or at least have a general picture of how to disassemble and reassemble a slicer. Cleaning it shouldn’t be too hard of a job now.
Just remember to read the manual for your particular model of the slicer to ensure you are aware of all safety issues.
That’s it folks, thank you for reading my article on how to clean a meat slicer.
![How To Grind Bones Without A Grinder? [A Detail Guide]](https://meatgrinderguides.com/wp-content/uploads/2021/10/how-to-grind-bones-without-a-grinder-150x150.jpg)


